
~well hello friends~
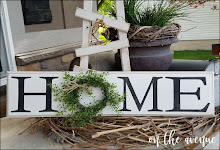
Welcome To ~Make Your House A Home~.......... This is our Saturday post where we share the things that ~Makes Our House A Home~. For today's post I wanted to share a fun wreath I made. It took a couple hours and was quite messy, (ok, really messy) but the end product was super stinkin' cute!!!
A Burlap Wreath
I have seen many tutorials on this type of wreath so I purchased the wreath and burlap months and months ago. I finally took some time and made this! This is a super easy project. It was really messy and I had to run right to the shower when I was done because my whole body was itching.... but oh, it was worth it.

The first step was to cut my burlap into 4" strips. I used my rotary cutter and cutting board. I have cut burlap many times with my scissors, but didn't want to take the time for this project.

After I had all of my strips cut, I cut the strips into 4" squares.

This part reminds me of my first grade art projects. I know you all have done this at one time or another. Remember that one we made with tissue paper????? The one where we twisted the square pieces of paper around the end of our pencil eraser and dipped it in Elmer's Glue and then placed it on the craft paper. I LOVED that craft! One of my favorite.......
That is the exact same process for this wreath. Get ready for the childhood memories to come rushing back!! I twisted the 4" square pieces of burlap around a marker and added a little hot glue onto the end of the fabric. I placed it right on the wreath, held it there for a few seconds and tadaa!!!

I glued and glued and glued and glued and glued - and then started itching, but I continued to glue!!! I couldn't wait for this project to be completed!

Are You All Ready For The End Result???
(After I just typed that sentence, I remembered I already showed the finished project in the first picture.) Maybe I need a long nap!!!

I am really excited to make a couple more of these wreaths with different colors of burlap. I have used green, red, orange and cream. Oh, just think of the possibilities!!!
~thanks for sharing part of your day with us~
Enjoy Making Your House A Home!
~Mandy~


No comments:
Post a Comment